YOU'VE EARNED FREE SHIPPING & GIFTS!
November 09, 2020 10 min read
Do you ever wonder how your fingers move? When you improve your grip strength, your palms aren’t getting thicker. Nobody is out there looking to get their index finger jacked. You can pinch a section of your finger and retain a full range of motion. What’s going on in there, how do lifting straps help, and what do your fingers have anything to do with the perfect deadlift? Well buckle up, strap yourself in, and we’re about to teach you something new.
Pretty much every single one of the pulling exercises in the world requires the participation of your grip strength. You’re not getting a single pound off of the ground if you can’t keep your fingers wrapped around the bar. In that way, your grip strength is probably the single most important factor in your deadlifts or any other pulling exercise.
Flexing your fingers comes from the muscles in your forearm. That may seem counter-intuitive, most muscles in your body that move a limb are basically right on top of them. Your fingers are a bit different though. Try grabbing your forearm and moving your fingers. All of that movement under your hand is essentially a complex system of pulleys. The muscles in your forearm that close your hand are called flexors. There are five of them that run the length of the lower half of your arm to allow you to clench and flex your fingers. Without the flexor compartment of your forearm, you wouldn’t be able to turn your wrist to grasp the bar when you start your rack pulls.
The largest muscle in your flexor compartment is the flexor digitorum. It might be pretty easy to guess what this muscle does. We’ll give you a minute if you haven’t figured it out yet... This runs the length of your forearm and separates into four tendons that reach all the way to the last joint in all of your fingers that aren’t a thumb. Contracting this muscle tugs the fingers in towards your palm. You can see this in action by letting your hand lay open in a relaxed position and pushing on the underside of your forearm. Your fingers will move without you asking them to. The flexor digitorum is the sore one after you do a day of lifting heavy weights. When you’re increasing your grip strength, you’re not making your fingers more resilient or pumping your palms. What you’re really doing is jacking up that flexor digitorum. If you want a strong handshake or a better chance at powerlifting, your best angle of approach is to start with good grip strength.
To understand lifting straps, how they can help, and when to use them you have to understand where your grip strength comes from, and what’s happening in your body when you feel it failing. You can lift much longer and add more weight if you find a way to remove your limiting factors. Investing in a set of lifting straps is only a good move if you know what you’re doing with them, and how to keep them from throttling your progress.
Consider the last time you got some good lifts in. What felt more tired first? When you’re trying to push your quads past their limits is there something that keeps you from really hitting that goal? What is that limiting factor? Do you feel like your grip strength is something that you could be improving? Are you creating a bottleneck in your routine? Is your wrist support lacking? If you’re honest about these answers you’re well on your way to understanding wrist straps.
A good way to oversimplify wrist straps is to think of them as a sort of seat belt for your weights. What they’re doing is latching onto the bar and keeping it from rolling away from you by applying that force to a part of your body and alleviating some of the tension from your flexors, and allowing you to really push the rest of your body when your forearms start to give out early. This does not mean that you get to use them as a crutch, however. Wrist straps aren’t a substitute for grip strength, and they don’t make you stronger. They are best thought of as a supplement to your routine. By adding lifting straps to your workout, you can focus on the muscle groups that naturally have more stamina than your flexor compartment without having to add a potentially painful hook grip to your inventory. If you’re constantly working on your grip strength then, by all means, feel free to slap on a pair of straps towards the end of a hard day.
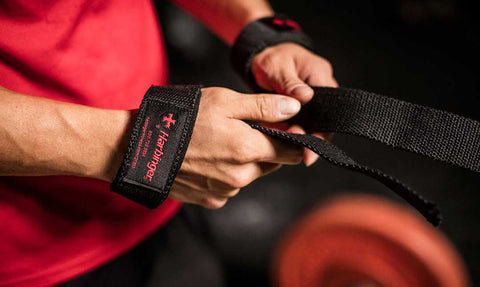
When you get your first pair of lifting straps, you might be confused. They’re basically just two strips of fabric with a hoop on the end. How does this work? Where does the seemingly magical ability to assist your grip come from? Worry not, because we’ve got your back (or your wrists in this case).
The lifting straps require a tiny bit of assembly, in the loosest sense of the word possible. You’re going to grab the end of the strap opposite of the hoop and tuck it through without twisting the stap up all crazy. It’s a very straight forward action, just grab and tuck, no need to adjust until your hands are through, and nothing needs to be tied. There you go, you’ve assembled your first lifting strap. Do the same with the second one, and you’re good to go.
To start using the lifting straps, just slip your hand throug the loop you’ve created by tucking one end into the small hoop, and tighten it until it comes down around your wrist. Don’t over tighten them. Even though they’re here to help take some of the pressure off of your grip, you still need blood flowing in through your hands when you exercise. You’ll know you have the right straps on the right wrists when the long end of the strap follows the angle of your thumb. This is going to be important later, so pay attention here to avoid having to adjust later.
To utilize these straps in your lifts all you need to do is bring the strap up under your hand. That long end that’s lined up with your thumb? Start with it under the bar you’re lifting, and wrap it one time towards your body, and bring your hand down to it, and twist like you’re revving a motorcycle to tighten it just a touch. Do the same with your other hand, and you’ve successfully employed the help of your wrist straps.
Make sure you don’t wrap the strap around the bar too many times. You want to be able to let go of your weights in case you’ve overcommitted, or your flexors can’t handle the workout you’re down. You’re not tying yourself to the bar, you’re applying an opposite force.
Speaking of an opposite force, let’s think about what’s going on with these lifting straps in the first place. When you’re grabbing these bars and contracting your fingers you’re still essentially twisting the bar towards your body. Wrapping this strap the opposite direction and taking hold of it creates a little bit of equilibrium, and twists the bar the other way to give your flexors a break. With a less intense commitment to the act of simply holding the bar, you’re free to dig into those quads or whichever muscle group you’re doing the real heavy lifting with.
Lifting straps are for overcoming your grip strength temporarily and giving you the opportunity to blast through your strength training goals and focus on your grip strength without getting in the way of your bodybuilding targets.
A basic rule of thumb is to look out for exercises that use gravity against you, and require a decent amount of grip strength as a barrier to entry. These two factors together create obstacles to an engaging and truly challenging workout. Remember to use straps only when you feel like your grip strength is getting in the way of reaching your max or reaching your set goal. You should still be increasing your grip strength naturally as a part of any of the exercises that could benefit from an opportunity to use straps, so if you find yourself relying on these reevaluate, and consider working on forearm and grip strength before coming back to them.
Lifters everywhere recognize the deadlift. Deadlifts are far and away the exercise that can benefit from the use of lifting straps the most. They exemplify nearly every single reason you would want to strap yourself in and keep pushing.
Let’s revisit proper deadlift form and analyze why this is.
When you deadlift you start with your barbell on the ground. Start with your feet shoulder-width apart, and grasp the bar overhand with your hands just outside of your legs. You can switch up your grip, for instance, you can implement a mixed grip instead of the double overhand, but this is a sort of half solve to the problem that lifting straps have already fixed without having to remember to alternate arms. Keep your back flat, don’t arch your upper spine, because doing this puts the weight in all sorts of places it doesn’t belong. Make sure you’re driving your hips to stand up with the weight as well as using your thighs, not your shoulder joints or your back.
So when you stand up to lift those weights, what part of your body is working the hardest to keep the barbell up in the air? Once you have the weight up off of the ground, you’re really only working your forearms, and that’s the problem. If you wear out the endurance of your forearms before you’re ready to be done with your lifts, then you’re squandering time in the gym.
Rack pulls are, on their face, just a deadlift with a smaller range of motion. However, the adjusted position focuses more on your upper back and allows you to focus on a weak area of your deadlift by changing your starting height.
Start by picking a starting height, lower to the ground will involve your glutes a little more, because of the lower crouch required, and a higher starting point put the burden more on your back. Once you’ve picked a point to focus on, take a stance similar to the deadlift. Feet shoulder-width apart, hands in an overhand grip just outside of your legs. If you’re having trouble keeping your back straight, then consider a weightlifting belt. Keep your arms and your back straight, and stand up straight with the weight to do your rack pulls.
Lat pulls downs seem like an outlier here, don’t they? The pattern so far has been lifting weights up from below you on a barbell. Lat pulldowns have you sitting on a machine and pulling the weight down from up above you, right? Then how can your lifting straps even help, if you’re not lifting?
Here’s where we start applying what we’ve learned so far. Lifting straps are used most commonly in lifting weight, but if we think about the grip we need to pull off the maneuver. Lat pulldowns still find you in constant danger of gravity pulling the bar away from you. When the grip is key that’s the time for the straps to shine.
Get yourself to the cable machine, and take a seat at the pulldown bar. Be sure to adjust the pads against your legs to keep yourself from lifting off of your seat, you don’t want to cheat yourself out of an honest pulldown. Adjust your starting height so that your arms aren’t being pulled out of their sockets, because that’s an easy way to injure your shoulders. Typically you want to approach the lat pulldowns with an overhand grip and hands shoulder-width apart, but if you want to target different parts of your upper body, then feel free to find a better grip for your goals. Lifting straps are particularly helpful with pulldowns since gravity is also fighting against your natural blood flow. If you find yourself losing your grip here, then lifting straps could handily save the day.
Pull-ups are another unexpected addition to this list, but imagine just hanging from the pull-up bar. The only muscles you’re going to be working are your poor flexors. Pull-ups aren’t going to be an exercise you’re likely to attempt with heavier weights, but they are tough for newbies. If you find yourself running headfirst into pull-ups and crumbling under the challenge because of your grip strength, then perhaps add a couple of lifting straps. If you feel like your back and biceps are capable of getting the job done, then get yourself strapped in, and boost your chin up over that bar.
The technique does not need to change when you get your straps involved in your pull-ups. Just make sure you have your straps on the right way, with the long end in line with your thumb, and find a bar low enough for you to reach without having to jump to allow yourself the time and space to flip your straps into place.
Bench pressing seems like a good candidate for lifting straps. You’ve got a barbell and a lot of weight, but remember the kind of work the straps are doing for you. The lifting straps are for aiding with your grip. Bench pressing doesn’t utilize your grip in the same way that pulling exercises do. It is possible that your wrists are overextending due to the weight on the bar, and maybe you feel like you could benefit from adding lifting straps, but they’re not going to do you a great deal of good. This one is easy to prove. Imagine what would happen if you were bench pressing and you opened your hands up. You could let the barbell balance on your palms. It would be hard, and it’s an awful idea, but this thought experiment does show you how little your grip strength is utilized in bench the press.
Common bench pressing issues are better served with the addition of wrist wraps. Adding a pair of wrist wraps to your bench press will encourage straight wrists, and keep you from overextending your flexors if your form does happen to begin to sag at the end of your reps.
Lifting straps are an excellent tool for embracing the true limits of your body. Unfortunately lifting weights is basically always going to require a good amount of grip strength, and your forearms just aren’t as big and capable of the stamina that your lats or quads are. It’s a matter of mass and anatomy, but physics and a little bit of fabric can help you surpass your limits one lift at a time. With the use of lifting straps, you can push your body to higher heights. If you’re training to be a strongman, trying your hand at Olympic lifting, or just doing some basic bodybuilding then loop straps are an excellent tool to help you reach your goals. Don’t get trapped thinking that they’re only for powerlifters or barbells, a pair of lifting straps will work just as well on your dumbbells if you find yourself having grip related bottlenecks. Remember to use them not as a substitute but as a supplement, and you’ll find yourself pushing further and further in no time.
Photo Credit:
Photo #1: Harbinger Fitness
Photo #2: WorkoutUni