
Rotator cuff injuries are annoyingly common and painful enough to put a hard stop to your upper-body workout routine. Your rotator cuff muscles are involved in just about every lifting and stretching exercise that puts any strain on your shoulders. If you don’t want to be stuck doing countless reps of timid biceps curls for weeks at a time, strengthening your rotator cuff muscles is imperative.
Most lifters know how important the rotator cuff is but they aren’t fully aware of its anatomy or how it works. As a consequence, they rely on exercises that activate rotator cuff muscles secondarily to larger muscles like the pecs or lats.
Read through this guide to get a fuller understanding of the rotator cuff and how you can target these lesser-known muscles specifically with 5 simple exercises. You’ll earn better shoulder stability in the rest of your strength training lifts and reduce the likelihood of shoulder pain or a rotator cuff tear.

Your rotator cuff has a really wide range of motion compared to other joints. Four muscles make up what we commonly refer to as the rotator cuff.
This is the biggest and strongest muscle in the rotator cuff. Located within and near the back of your shoulder, this internal muscle is responsible for internal rotation of the shoulder joint. Internal rotation occurs when your shoulder is at a 90-degree angle (normal posture) and you move your elbow out away from your side.
Found on the surface of your back near the scapula (shoulder blade), the infraspinatus stabilizes the upper arm bone within the shoulder joint and also helps with external rotation of the arm. External rotation is when your hand moves away from the midline of your body with your elbow bent to 90 degrees.
Running from the top of the upper arm bone (humerus) and the scapular bone, the teres minor helps with external rotation of the arm as well as shoulder joint stabilization and arm adduction. Adduction of the arm occurs whenever the arm moves toward the midline of the body. Although the teres minor powers arm adduction, larger muscles like the latissimus dorsi and pectoralis major do too.
Beneath your trapezius muscle on the back of the shoulder lies the supraspinatus. It’s often considered as one muscle together with the infraspinatus.
It also helps stabilize the shoulder joint and also helps with arm abduction, which is what happens when your arm moves away from the midline of the body.
Although the movements in these descriptions may seem to have fairly limited use in normal life, they actually happen all the time. The reason they seem so infrequent is that they almost always happen simultaneously with other muscles.
For example, whenever you reach up and open a cabinet, you experience both arm abduction and external rotation. Many strength training lifts activate the rotator cuff muscles in a similar manner. During a bench press, external rotation and abduction occur in the first half of the lift while internal rotation and adduction occur in the second half.
What exactly are we trying to keep from happening when we target the four rotator cuff muscles?
You’ve more than likely heard of rotator cuff tears, but those aren’t the only injuries your rotator cuff can sustain. Tears are also not always instant injuries as is so commonly believed.
In most cases, people slowly wear down their rotator cuff muscles. This could happen through overuse or it could occur because of the many overhead motions we make every day. Strengthening these muscles is meant to keep this gradual decline from happening.
Shoulder impingement is a less severe injury that nonetheless causes significant discomfort and pain. It occurs when a tendon in your shoulder catches on nearby bone or tissue. It could also just rub against bone or tissue.
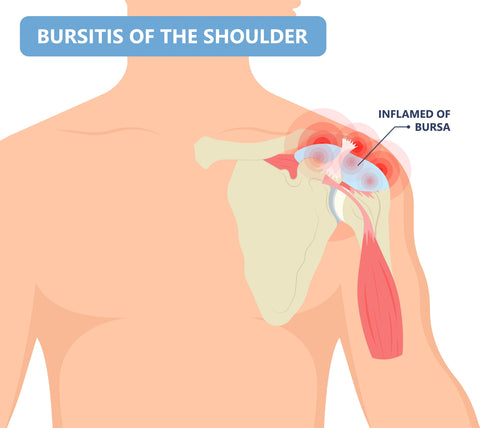
A fluid-filled sac called a bursa lies in the shoulder joint between tendons and bone to prevent friction. If there is too much friction between the bone and tendon, the bursa can become inflamed or swollen, a condition referred to as shoulder bursitis.
Shoulder bursitis is also called impingement syndrome since it is frequently caused by repeated rubbing between the bone and tendon, i.e. frequent shoulder impingement.
If the tendon itself becomes inflamed from friction or frequent impingement, you run the risk of shoulder tendinitis, which has a minimum recovery time of two to four weeks. Any of these conditions can cause a painful chronic condition or an acute injury that takes weeks or months to heal.
You can say goodbye to overhead motion and most upper-body strength training exercises during that time. As we age, the likelihood of these conditions increases.
In addition to the five strengthening exercises in this guide, you should also practice regular stretching and make sure your body has everything it needs to maintain proper shoulder health and recover as quickly as possible if you do experience a rotator cuff injury.
Most common medical advice points to nutrients and anti-inflammatories like Vitamin C.
You can also supplement with other natural nutrients like turmeric, ginger, calcium, and magnesium. Many tennis players and other athletes take proteolytic enzymes alongside physical therapy to make rotator cuff and other shoulder injuries heal as quickly and effectively as possible.
You should also perform frequent shoulder exercise warm-ups even when you aren’t planning on running through a full routine that day. Although your body needs time to recover from tough workouts and initiate hypertrophy, it can generally handle low-intensity stretching almost every day.
The last thing you can do is make sure you don’t injure your rotator cuff with sudden harmful movements. To do so, you should make an effort to understand how the shoulder joint moves and what sorts of movements are painful or just not meant to be performed. Frequent warm-ups and mindful shoulder exercises are a great way to learn this information.
The following exercises are used by physical therapists and practitioners of sports medicine to prevent rotator cuff injuries and for pain relief when injuries do occur. Add them to your workout routine at least a couple of times a week. If you have sustained a rotator cuff injury, seek medical advice before performing these exercises.
This is a great exercise for people who still want to put a little bit of weight on their shoulders when they’ve already sustained a rotator cuff injury. You can do it with some very lightweight plates or small dumbbells.
Studies have shown that the full can as described below is the ideal move for targeting the supraspinatus with as little deltoid activation as possible so that the rotator cuff muscle is doing most of the work and getting most of the strength gains.
Hold two weight plates or two very light dumbbells in your hands and hold them at your sides a short distance away from your hips. Stand with your feet shoulder-width apart and pull your shoulder blades together and back.
Slowly raise both hands in front of you until they reach slightly above shoulder height. Lower them to return to the starting position and complete one repetition.
The goal with the full can exercise is a calm, fluid up-and-down movement. Don’t rip the weights up like you’re trying to do a press - remember that this is an exercise to prevent injury, not necessarily to get ripped.
Make sure your shoulders aren’t raising as you move through the full can. Your thumbs should be pointed up the whole time. Run through 2 or 3 sets of 10 reps to start with and increase carefully as you progress.
Two opposite movements make up this banded exercise. It’s probably best to focus on getting all your external rotations done before moving to internal ones and finishing on one arm at a time unless you have the perfect set up to do both arms at the same time. A loop band will probably work best for this exercise, although you could also use a tube band with a handle or just tie off a regular therapy band.
Remember how we described these movements close to the beginning of this rotator cuff exercise guide? We’re about to mimic that with the even tension of a resistance band.
To perform the external rotation exercise, stand on the inside of a vertical bar or some other anchor point. That is, if you are working out your left arm, stand to the left of your anchor point. Secure the resistance band and take it in your left hand with your left elbow tucked in at the hip and bent to a 90-degree angle.
Slowly pull the band by moving your left hand out to the side, making sure to keep it at hip level as you do so. Voila, we have external rotation and a great workout for your infraspinatus and teres minor.
Now, for the internal rotations, you’ll want to stand on the opposite side of your anchor point or turn around if you’re using something like a door handle to secure the resistance band. If you’re working out your left shoulder, stand with the anchor point on your right side.
Secure the band and take it in your left hand with your left elbow tucked in at the hip and once again at a 90-degree angle. Pull the band by moving your hand in toward your torso. This targets your subscapularis. Move it back out to complete one repetition.
If you have two anchor points, you could theoretically stand in the middle of them and alternate which hand holds which resistance band to do both of these exercises without having to set up again. But we’d advise taking it slow until you’ve mastered these moves.
Another solid resistance band exercise is called the robber because at the top of the move your hands will be up in the air as if you were facing a mugger.
Your infraspinatus, serratus anterior, and lower trapezius muscles are all activated by this exercise.
Unlike the internal and external rotations, you can work out both sides of your body at once. Tie off a therapy band to a single anchor point and take either end in each hand for this exercise.
Stand with your feet about shoulder-width apart and stand far enough away from your anchor point that the resistance band is taut but not full of tension. Your hands should be out in front of you with your elbows bent to about thirty degrees. Keep your hands in front of your torso and not out to the side by pulling your shoulder blades back.
Next, move your hands backward and up until they’re at shoulder height and out to either side. Make this a controlled movement. Your shoulders shouldn’t raise up at all. Slowly return to the starting position to complete one rep.
You can use a cable machine or a resistance band to perform this exercise. It’s potentially the best single rotator cuff exercise if you could for some reason only stick to one of the five in this guide.
All four muscles in the rotator cuff are worked out during this external rotation press, although as you can tell from the name it prioritizes external over internal rotation.
If you’re using a cable machine, set your weight fairly low. For those using a resistance band, find a low anchor point that will be around head level when you kneel on one knee in front of it.
Once you’re set-up, kneel on one knee in front of the cable machine or your anchor point. Take the handle or band in one hand only - this exercise has one too many stages to perform bilaterally. Hold the end of the band or the handle of the cable machine just far enough away so that it is taut. This is the starting position.
Pull the band back until your elbow is at a right angle even with your torso. Next, raise your fist above your head without moving your elbow out of position; it should only rotate. Finally, put your fist in the air and straighten your elbow completely.
Slowly and evenly reverse each of these movements in exactly the opposite order. That’s one rep. Continue to complete all your repetitions on the first side before switching arms.
This is an easy exercise that works well as a warm-up or a cooldown for your rotator cuff muscles. If you don’t have any equipment or you just want to stretch out your rotator cuff muscles, the doorway stretch is the one to use.
Although it is a very straightforward exercise, it’s important not to walk too far forward. You could overextend your shoulder muscles or slowly build up to a tear over time. That being said, you’ll ideally be building shoulder flexibility and be better able to withstand more stretching over time as well.
All you really need for this exercise is a standard doorway. Make sure you can open the door all the way and move across the threshold unhindered.
Stand in front of the doorway and put your hands on either side of it. They should be slightly above your shoulders. Bend your elbows as needed to accommodate this height.
Now walk through the doorway without moving your hands. Keep your back straight and let both arms stretch behind you as you move forward. Put your weight on your toes to stretch your shoulders and rotator cuff muscles as much as possible, then reverse the movement to go back on the other side of the door.
The rotator cuff muscles are some of the most frequently injured muscles in the human body. They can fall victim to overuse or sudden injury. Normal wear-and-tear can also weaken the four muscles in the rotator cuff.
Fortunately, a few simple exercises can help target these muscles directly without allowing larger muscles in the back, shoulders, or chest to take over and rob them of their strength gains.
These exercises can supplement a well-designed arm and shoulder exercise routine to make your whole upper body stronger and prevent serious injury.
If you want to ensure you won’t be blocked from achieving your fitness goals by a rotator cuff injury, use the five exercises in this guide to make your rotator cuff muscles stronger. You’ll also be better prepared for the more complicated lifts that make up the rest of your strength training routine with strong rotator cuff muscles that won’t wear out.


